


Table of Contents
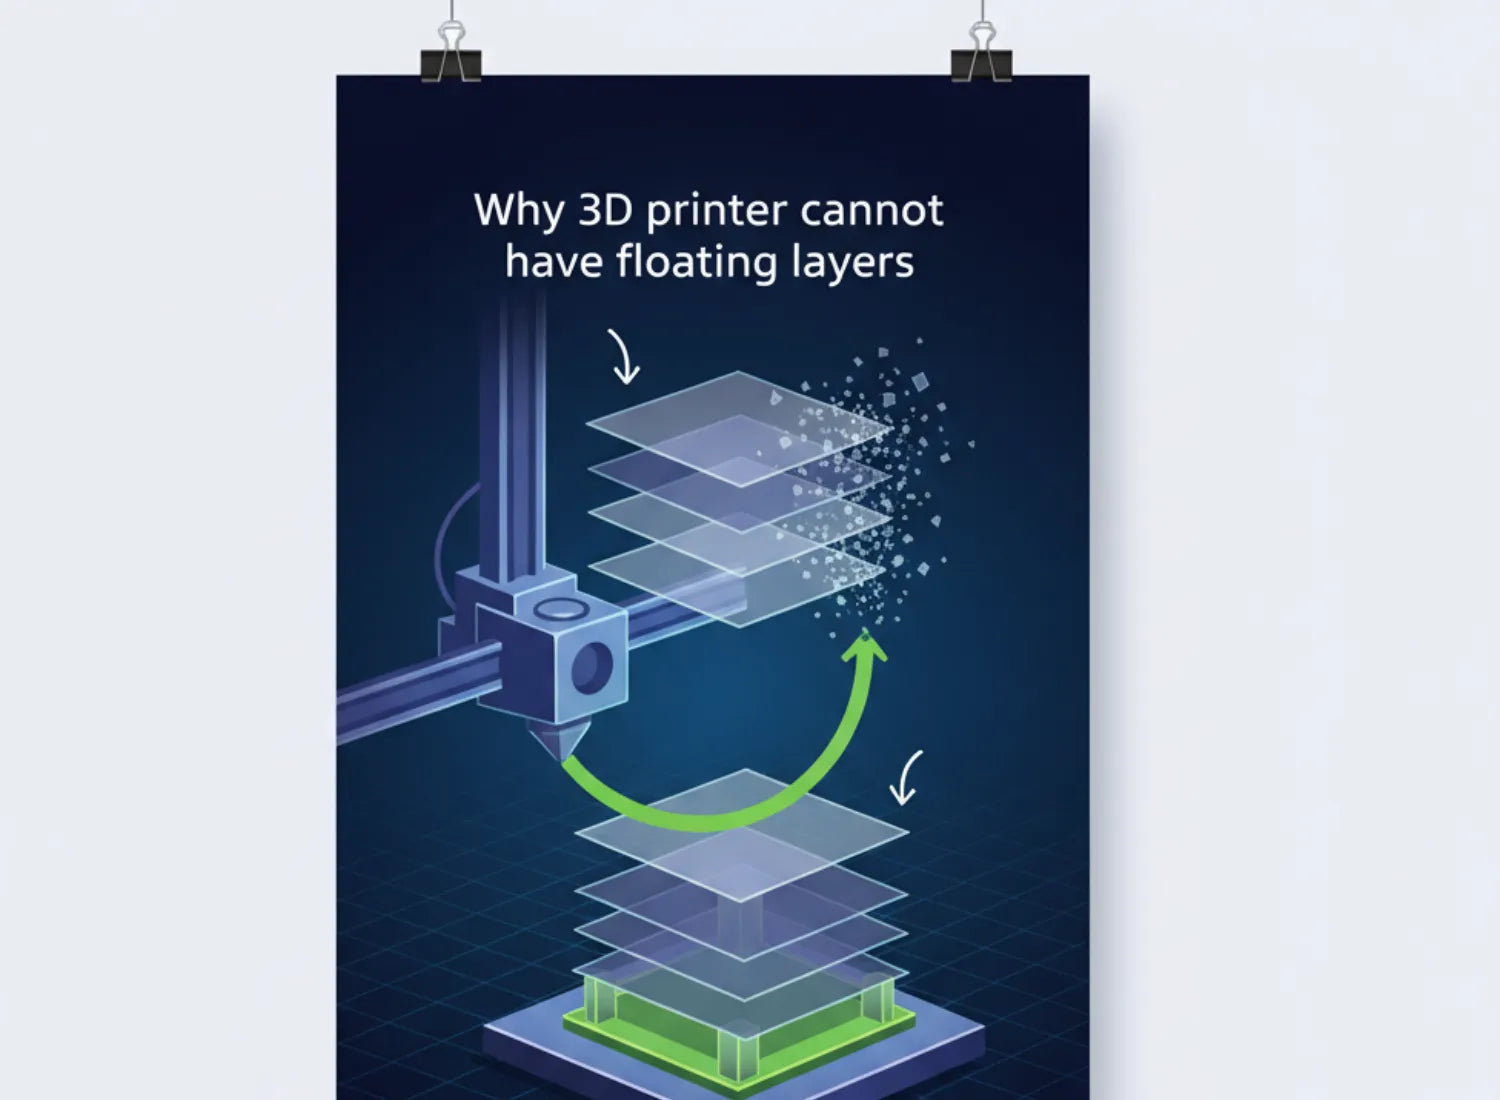
Printing a layer that literally begins in mid-air—a true "floating" layer with nothing beneath it—is a phenomenon that frequently challenges both novice and expert users in additive manufacturing. While the digital model may suggest unlimited geometric freedom, the physics governing most common 3D processes prevent this from occurring reliably in reality.
Most common 3D printers, specifically Fused Deposition Modelling (FDM) printers, cannot print floating layers because they construct objects layer by layer from the ground up. This layer-by-layer methodology is the core mechanism of FDM. The newly deposited material requires either a previously solidified layer or a temporary support structure to sit on. Without this solid base, gravity will inevitably pull the hot, semi-liquid plastic downward, leading to a failed print.
This fundamental limitation generates specific geometric challenges, primarily involving overhangs and bridges. When a 3D printer attempts to create a layer in mid-air, the hot plastic has no foundation and will simply droop and fall, resulting in a stringy mess rather than a stable structure.
This Flashforge 3D printing guide will not only explain the simple physical reasons why this occurs but will also delve into the clever solutions, from indispensable support structures and smart design strategies to alternative 3D printing technologies that successfully overcome this constraint.
How FDM 3D Printing Works
The most common three-dimensional (3D) printing methods, specifically FDM 3D printers, construct objects through an additive, layer-by-layer process. This methodology involves melting a 3D printer filament and precisely extruding it through a nozzle, thereby building the object one horizontal slice at a time. Crucially, for the structural integrity of the print, each new layer must be deposited onto a previously solidified layer.
The Problem of "Printing on Thin Air": Why Hot Plastic Falls
The fundamental reason a 3D printer cannot create floating layers is the relentless effect of gravity. Every new layer of a 3D object requires a solid base beneath it. The material being deposited—whether hot, semi-liquid plastic filament (FDM) or uncured resin (SLA)—is soft or molten at the point of deposition.
Gravity constantly pulls this molten material downwards. While cooling fans work to solidify the material rapidly to maintain shape, if a part of the design extends into open space with no foundation beneath it, gravity invariably prevails. The unsupported material will simply droop, sag, or lose its intended shape, resulting in a failed print. This phenomenon is analogous to attempting to draw a line in the air with hot glue—the result is typically a stringy mess rather than a stable structure.

An Introduction to Overhangs and Bridging
The structural necessity for a solid base beneath each layer generates two critical geometric challenges in 3D printing: overhangs and bridges.
What is an Overhang? The 45-Degree Rule Explained
Overhangs are defined as sections of a model that extend outward, relying only on partial support from the layer beneath them. Overhangs are susceptible to poor layer adhesion and can result in weak, easily separated layers (delamination) as the contact area shrinks.
A widely adopted guideline for navigating overhangs in FDM is the 45-Degree Rule. This rule posits that features angled at 45 degrees or less from the vertical axis can typically be printed successfully without the need for dedicated support structures. This threshold is effective because the new layer maintains sufficient foundation—at least 50% contact—on the layer below, allowing for adequate adhesion and cooling before sagging occurs.
What is Bridging? Connecting Gaps Without Support
Bridges are horizontal segments of a model printed between two already supported points, resembling the connecting bar in the letter ‘H’. While FDM printers can successfully span short gaps, or "bridge," long unsupported sections remain a challenge.
The limits of bridging capability are material and machine-dependent, but typically, bridges longer than 12mm often fail or require support structures, as gravity pulls the filament down. For a bridge to succeed, the material must solidify quickly and possess sufficient stiffness to avoid drooping.
How to Print Models with "Floating" Parts
When a design incorporates features such as bridges, steep overhangs (steeper than 45 degrees), or isolated sections known as "floating holes" or "isolated islands," corrective measures must be implemented.
Introducing Support Structures: The Scaffolding for Your Prints
The conventional, reactive solution is the use of support structures. These are temporary, disposable scaffolds automatically generated by slicing software. They are essential because they provide the necessary solid base and foundation for challenging features during the print process, thereby preventing the filament from falling or sagging.
When to Use Supports: Identifying Problematic Areas in Your Model
Support structures are critical when geometric elements push the limits of FDM printing:
-
Steep Overhangs: Angles steeper than 45 degrees necessitate supports.
-
Long Bridges: Bridges longer than 10mm or 12mm require added support.
-
Isolated Islands/Floating Pieces: Features such as horizontal branches that are too thin, sloping downward, or disconnected from the main body on a given layer (isolated islands) are impossible to print reliably without support from below. The slicer may even "prune" or eliminate these elements if they are too small or isolated, resulting in floating pieces or empty layers in the sliced output.
How Re-Orienting Your Model Can Eliminate Floating Layers
One of the most effective methods to minimize or eliminate the need for support is optimizing the part orientation. By rotating the model, designers can often angle problematic faces to be self-supporting (at 45 degrees or less), drastically reducing the volume of extra support material needed. For example, printing a letter 'T' upside down eliminates the need for any supports under its horizontal arms.
Practical Steps: Enabling and Using Supports in Your Slicer Software
Slicing software like Orca-Flashforge provides the interface for both generating support and fine-tuning print parameters to manage unsupported geometry.

How to Turn on Automatic Support Generation
The initial step for handling problematic geometry is to enable automatic support generation within the slicer. The software detects regions that exceed the defined overhang angle threshold and automatically generates low-density pillars beneath them.
Key Support Settings to Know (Support Density, Pattern, and Z-Distance)
To achieve successful prints while managing material waste, several support settings should be tuned:
-
Support Density: Setting the support density at approximately 40% is suggested as a balance between saving material and maintaining the necessary print strength.
-
Pattern: Makers typically use patterns like Grid or Zigzag. Concentric infill patterns can also be utilized to hold up the bottom layers and spread heat effectively.
-
Z-Distance (or Z-Gap): Adjusting the Z-distance (the vertical gap between the support top and the model bottom) is critical for ensuring clean removal of the support structures without damaging the print surface.
Beyond dedicated support settings, slicers allow for critical parameter adjustments to improve unsupported performance, such as maximizing cooling fan speed (often to 100%) and reducing print speed for overhangs and bridges, which gives the material more time to cool and stabilize.
Standard Supports vs. Tree Supports: Which One is Right for Your Print?
FDM users generally choose between two primary styles of support structures:
|
Support Type
|
Strength
|
Ease of Removal
|
Surface Impact
|
Best Use Case
|
|
Lattice/Grid Supports
|
High
|
Moderate
|
Rough
|
Overhangs, bridges
|
|
Tree/Organic Supports
|
Low
|
Easy
|
Minimal contact
|
Minimal contact points
|
Lattice/Grid Supports are the traditional, grid-like structures, which are strong and stable but often use more material and can be difficult to remove, potentially leaving rough marks on the finished part.
Tree/Organic Supports are a modern, highly efficient alternative that resembles branching trees. They use significantly less material, print faster, and are much easier to remove due to their minimal contact points with the model, typically resulting in a cleaner surface finish.
For applications requiring an immaculate surface finish, soluble supports (e.g., PVA for PLA or HIPS for ABS) are an excellent option, though they necessitate a dual-extruder 3D printer for simultaneous material handling.