


Table of Contents
3D printer poop is essentially the 3D printing waste produced by single-nozzle multi-color systems. It occurs during forced purging, which clears out residue from the previous filament to ensure the new color stays pure. While this process makes beautiful multi-color prints possible, it also causes significant cost concerns and environmental pressure for users. In this article, we will take a fresh look at this phenomenon and provide the most practical optimization solutions for 2026.
What Is 3D Printer Poop and Why Does It Happen?
3D printer poop is not a sign of a malfunctioning machine. Instead, it is a necessary byproduct of modern multi-color printing protocols. Because most systems rely on a single extrusion path, these waste purges are essential to achieving high color accuracy.
Definition of Purge Waste in 3D Printing
In the technical world of 3D printing, purge waste refers to the material segments that the extruder actively ejects during a filament swap. These pieces cannot be part of the final model. When a printer executes multi-color instructions, a single-nozzle system must switch materials between layers or between different color blocks on the same layer.
This process involves several mechanical steps:
-
Cutting and retracting the old filament.
-
Pushing the new filament into the hot end melt zone.
-
Discharging mixed material until the color is pure.
During this transition, residue from the previous material inevitably remains in the melt zone, causing the old and new filaments to mix at high temperatures. To prevent visible color bleeding, streaking, or structural weaknesses on the model surface, the printer must discharge enough material into a waste area until the output color perfectly matches the current requirement. While these coiled or clumped scraps may look messy, they serve the vital functions of cleaning the melt chamber and stabilizing internal pressure.
Multi-Color and Multi-Material Printing Waste Mechanism

The waste mechanism in multi-color and multi-material printing is dictated by the laminar flow characteristics of the fluid. Inside the nozzle, the filament does not act like a piston that pushes out the previous substance in one clean block. Instead, the fluid in the center moves faster while the material near the walls moves slower due to friction.
This leads to specific technical challenges:
-
Pigment Contamination: Small amounts of pigment clinging to the inner walls will continue to contaminate the new filament even after most of the old material is gone.
-
Color Shift Intensity: This contamination is especially noticeable during drastic color shifts, such as moving from black to white.
-
System Cycles: Current single-nozzle solutions rely on automatic material systems (AMS) or similar tool changers that use complex cutting, pulling, and reloading steps.
Every full cycle generates a preset volume of waste. Industry experts note that when printing small multi-color parts, the weight ratio of waste to the finished product can sometimes reach a staggering 3:1.
Purge Cycles and Trigger Conditions
Purge cycles follow the G-code instructions generated by slicing software. Whenever the system detects a change in the filament slot index, the machine enters a programmed sequence: cutting, retracting, loading, extruding, and wiping.
The volume of the purge depends on specific variables:
-
Material Properties: The physical characteristics of the filament.
-
Software Models: Preset calculation models built into the slicer.
-
Functional Requirements: For instance, when switching from a support material like water-soluble PVA back to a structural material like PLA, the system triggers a more thorough purge to ensure layer adhesion remains strong.
Additionally, the machine may perform small pre-print purges to stabilize internal pressure or remove bubbles caused by thermal expansion when temperatures fluctuate or the nozzle first heats up. While these cycles guarantee a high success rate, they also significantly increase total energy consumption and material loss, acting as a bottleneck for cost-effective large-scale production.
What Causes Excessive 3D Printer Poop?
While clearing 3D printing waste is a technical necessity, excessive accumulation often points to deeper issues of systemic inefficiency. This inefficiency stems from the inherent limitations of 3D printer hardware. It is also closely linked to slicing logic, material properties, and the rationality of the model design.
Frequent Filament Changes Impact
Filament change frequency is the primary variable determining total waste. In multi-color models, if colors are scattered too finely along the Z-axis, the printer must switch multiple times on every layer. For example, when creating intricate 3D printed toys, a figurine with multi-color textures might require jumping between 4 to 5 colors per layer. This means generating 4 or more pieces of waste for every single layer printed. According to stress tests conducted in our lab, increasing change frequency directly inflates material loss.
It also causes printing time to grow exponentially due to frequent acceleration, deceleration, and tool-change intervals. For print farm operators pursuing high output, this double waste of time and material caused by frequent changes is considered an economic absurdity.
Inefficient Slicer Settings Effects
Default configurations in slicing software are often the invisible hand behind mountains of waste. Manufacturers typically set extremely conservative flushing volume coefficients to ensure perfect transitions for any filament brand. This one-size-fits-all setting (such as a default coefficient of 1.0) often overestimates cleaning needs. This results in large amounts of purge material being expelled even after the color has turned pure. Furthermore, if the size and density of the prime tower are not dynamically adjusted to the model volume, additional material loss occurs. Many users directly follow system recommendations without manual optimization, which is particularly inefficient when handling simple two-color models.
Nozzle Contamination and Colour Mixing Issues
The physics of pigment diffusion has a decisive impact on waste volume. Dark filaments like carbon black or deep blue contain high concentrations of pigment particles. These easily leave residues in the tiny gaps of the nozzle cavity. Based on our test data, switching from black to white typically requires 2 to 3 times the flushing volume compared to the reverse switch from white to black. If the slicing software does not perform dynamic path planning for specific color combinations, redundant purging actions will occur. Additionally, the material and machining precision of the nozzle's inner wall affect filament buildup. Cheap hotends with high surface roughness worsen color mixing issues, forcing users to increase flushing volumes to maintain surface quality.
Printer Design Limitations on Waste Control
Traditional single-nozzle and single-extrusion systems are physically destined for inefficient filament changes. Because they share a single melt pool, every switch faces the impossible threshold of a complete clean. Related hardware flaws include a long distance between the cutting position and the nozzle tip. This forces residual filament segments to be cleared through extrusion rather than retraction. Furthermore, a lack of smart sensors in the purge area is a major drawback. Most current machines cannot monitor the color purity of the waste in real-time and can only blindly execute preset discharge lengths. In the 2025 to 2026 industry landscape, this blind purging is gradually being replaced by more accurate sensor feedback systems. However, on older models, this remains a persistent cause of waste buildup.
How to Reduce 3D Printer Poop with Smart Settings
Without changing hardware, deep tuning of slicer parameters can reduce waste by 30% to 60% on existing machines. This involves more than just adjusting parameters. It requires a complete rethink of printing logic.
Optimizing Purge Volume and Tower Size

The first step in reducing waste is precise control of the Flushing Volumes table. Users should not rely on default global coefficients. Instead, perform stepped calibration for specific color combinations. By printing small color transition test blocks, you can find the minimum threshold needed for each color switch. We have organized these empirical values into the following reference table to guide more scientific settings:
|
Transition Path (From -> To)
|
Suggested Multiplier
|
Estimated Material Efficiency Gain
|
Notes
|
|
White -> Black
|
0.40 - 0.50
|
High
|
Light to dark; very low contamination
|
|
Black -> White
|
0.85 - 1.00
|
Low
|
Dark to light; sensitive to pigment residue
|
|
Yellow -> Red
|
0.60 - 0.70
|
Medium
|
Analogous colors; natural transition
|
|
Support -> Main
|
0.75 - 0.90
|
Medium
|
Needs to balance interlaminar strength
|
Additionally, prime tower size should be linked to its stability. Reducing the tower footprint or using a sparser infill pattern maximizes material savings while keeping nozzle pressure stable.
Wipe and Prime Feature Optimization
Modern slicing software like Orca-Flashforge includes several strategies to turn waste into effective structures. The most critical features are Wipe into Infill and Wipe into Supports. These functions allow the printer to use transition filament for the internal infill areas of the model or for support structures that will be removed later. This method cleverly uses non-visible parts of the model to absorb waste, significantly reducing accumulation in the purge chute. However, pay attention to wall thickness when using this feature. If the outer wall is only one layer or if you use translucent filament, shadows from the transition color might show through and affect the appearance.
Efficient Multi-Colour Printing Strategies
Strategic layout and planning are often more powerful than fine-tuning parameters. One highly practical solution is batch printing. Placing multiple identical multi-color models on the same build plate is effective because the filament change for each layer is performed for the entire plate. The total amount of waste does not increase significantly with the number of models. This means the waste cost per model drops sharply as the batch size grows. Furthermore, color layering awareness during the design phase is vital. Try to keep color changes on horizontal levels. Using color change by height instead of frequent intra-layer changes can reduce thousands of swaps to single digits. This is currently the most efficient low-waste printing logic.
Advanced Slicer Profile Configuration
Advanced users can achieve finer waste control by modifying G-code scripts. A widely used optimization involves adding a specific retraction command before the cutting action. By retracting the molten filament upward by about 20mm while the hotend is still warm, you can reduce the volume of residual material left in the nozzle tip. Slicing software might not show this saving in the preview interface, but every piece of purged waste will actually become shorter. Additionally, increasing layer height is another way to optimize efficiency. For example, moving from a 0.16mm to a 0.24mm layer height reduces the total number of layers. Since the number of filament changes drops with the layer count, total waste is reduced.
Best Practices to Minimize 3D Printing Waste and Improve Print Efficiency
Proper Printer Selection for Multi-Colour Jobs
Choosing the right hardware for specific applications is the starting point for solving waste issues. For educators or home studios focusing on cost and ease of use, integrated single-nozzle systems remain the first choice. These users typically value equipment stability and setup speed over extreme material turnover rates.
In this area, the Flashforge Adventurer 5M Pro shows excellent adaptability. it uses innovative one-click automatic leveling. This works with pressure sensors to accurately capture the micron-level gap between the nozzle and build plate. This completely eliminates failure risks and filament waste caused by manual leveling. During multi-color switching intervals, the quick-swap nozzle system allows users to change hotends in 3 seconds without tools. This design counters the inherent discharge costs of single-nozzle systems through high maintenance efficiency. It is an effective tool for the rapid prototyping stage.
Print Planning to Reduce Filament Switching
Efficient print planning requires users to model the entire production cycle before clicking the print button. This includes a deep understanding of physical material properties, which you can further explore in the complete guide to 3D printer filament types. Examples include the different thermal expansion coefficients of PLA, PETG, and TPU and how they interact during purging. Experts suggest considering embedded design when creating multi-color models.
Design complex patterns that would normally require intra-layer color changes as independent parts. Use reserved tolerance holes for later assembly or inlaying. This not only eliminates purge waste but also allows each part to use the material best suited for its function. For instance, use PLA-CF for structural parts and Silk PLA for decorative ones. This greatly improves the quality and functionality of the final product.
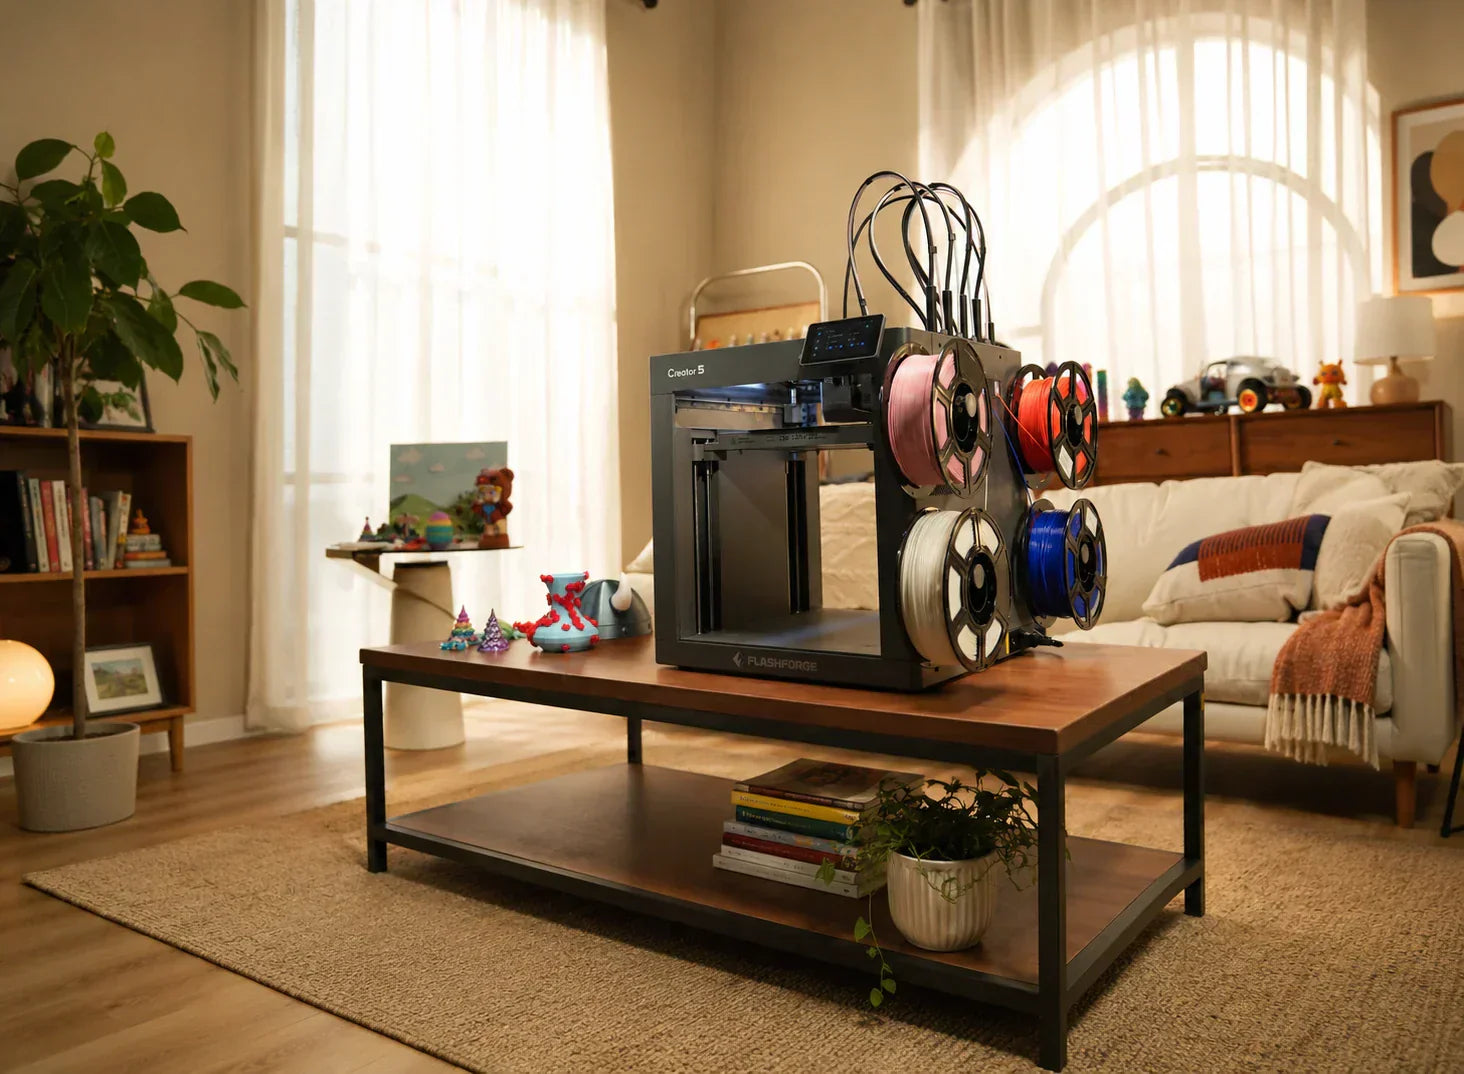
Using Multi-Toolhead 3D Printers Creator 5 for Waste Reduction
When printing needs shift from personal creation to small-scale production, the limitations of single-nozzle systems become obvious. To break the efficiency bottleneck caused by waste, industry leaders are turning to Multi-Toolhead architecture. This is no longer about how to optimize discharge. Instead, it is about how to eliminate discharge through hardware restructuring.
Multi-Toolhead System with Independent Extrusion
The 4-tool head 3D printer Flashforge Creator 5 represents this technical trend. It is equipped with the FlashSwap 4 independent toolhead system. This hardware solution fundamentally changes waste logic. Unlike traditional single-nozzle systems that force multiple filaments into one melt pool, the Creator 5 assigns an independent extruder and hotend to each material. When the printer needs to switch colors, it no longer performs tedious cutting and purging. It simply completes the toolhead handoff on the X-axis rail. The old nozzle returns to its station with its residue, and the new nozzle takes over immediately. This physical isolation eliminates the possibility of color mixing. It makes the concept of purge waste nearly disappear from the production process.
Elimination of Purge Towers in Workflow
Since there is no cross-contamination from a shared melt pool, the Creator 5 needs almost no large prime towers during printing. Our comparative tests in actual production environments show clear results. For a medium-sized model with 800 color swaps, a single-nozzle system produces about 250 grams of waste and takes hours to clean. The Creator 5 produces near-zero waste. It only keeps very small prime lines to ensure constant internal nozzle pressure. This reduction of the prime tower saves expensive filament. It also frees up build plate space. This allows users to arrange denser part matrices on the same machine.
Reduction of Filament Waste and Print Time
Improved time efficiency is another core asset of the Creator 5. A single filament swap on a single-nozzle system usually takes 60 to 100 seconds. On the Creator 5, toolhead swapping is shortened to a few seconds. Combined with a 600mm/s top travel speed and 30,000 mm/s² acceleration, the total time for complex multi-color tasks can be up to 500% shorter than single-nozzle models. This combination of speed and zero-waste characteristics makes multi-color 3D printing economically competitive with traditional injection molding for small-batch manufacturing.
Efficiency Gains for Production Environments
In demanding industrial applications, the advantages of the Creator 5 extend to material diversity. Independent toolheads mean users can mix materials with very different melting points in the same model. For example, combine high-temperature ASA with flexible TPU or easy-to-remove support material. This happens without delays or charring risks from frequent nozzle temperature changes. For companies producing industrial parts with complex internal channels or functional zones, this freedom translates to faster delivery and lower defect rates. It marks the transition from printing toys to manufacturing products.
Balancing Print Quality with Material Efficiency
In the process of reducing waste, the pursuit of surface quality remains vital. Improved material efficiency must not compromise interlaminar bonding or color boundary clarity. Multi-toolhead systems like the Creator 5 use automatic offset compensation. This ensures micron-level positioning accuracy during swaps to avoid gaps or overlaps at color boundaries. For single-nozzle users, this means finding the balance between saving material and preventing bleeding. This often requires long-term testing and experience.
Recycling and Reuse of Purge Material
Software optimization and hardware upgrades greatly reduce waste. However, completely achieving zero waste is still an ideal goal in the current additive manufacturing landscape. Statistics show that only about 12% of 3D printing filament currently comes from recycled sources. This proportion is expected to grow as recycling technology matures.
For the waste already generated, we recommend the following closed-loop solutions:
Physical Classification and Storage: Store PLA, PETG, and ABS waste separately. Mixed waste is very difficult to re-process because of different melting points. Classification is the prerequisite for recycling.
Desktop Shredding and Re-extrusion: For larger studios, investing in a small plastic shredder and single-screw extruder is feasible. Shred waste into particles smaller than 5mm. After drying, re-extrude them into filament. While the tensile strength of this recycled filament might drop by about 15%, it is perfect for printing structural prototypes or internal support parts.
Heat Pressing Applications: This is the easiest way to reuse material. Place colored waste into silicone molds. Heat them in an oven to the softening point. Press them into colored coasters, tool handles, or art pieces. This method consumes waste and creates products with unique marble textures.
Through these methods, 3D printing waste can find new life within a circular economy framework. This helps 3D printing transition from material-intensive to sustainable manufacturing.
Conclusion
To be honest, the waste issue in 3D printing is not some terrifying monster. It is more like a growing pain that the technology must face as it matures. Every optimization helps push waste down, from fine-tuning slicer settings and planning color schemes to choosing a more logical hardware architecture. As for the scraps that simply cannot be avoided, they always find a second chance to shine, whether they are ground down for recycling or heat-pressed into coasters. Technology will keep iterating, and materials will get smarter. However, the most critical factor remains whether the person using the FDM 3D printer is willing to put in a little extra thought. After all, wasting one less gram of filament is about more than just saving a few cents. It is a sign of respect for the act of making things.