


Table of Contents
TPU is one of the most useful materials for printing parts that need to bend, absorb impact, or resist repeated wear. It can be used for protective covers, wearable accessories, flexible hinges, seals, grips, rollers, and functional prototypes. However, TPU does not behave like standard rigid filaments. It can compress inside the filament path, absorb moisture from the air, and produce stringing when the settings are not properly tuned.
Successful TPU 3D printing starts with the right material grade and a compatible printer setup. Softer TPU requires slower speeds and more careful feeding. Harder TPU is usually easier to control but produces a less flexible part. This guide explains how TPU filament works, how Shore hardness affects printing, which settings to adjust, and how to solve common TPU print quality problems.
What Is TPU Filament?
TPU stands for thermoplastic polyurethane. It belongs to a family of thermoplastic elastomers that combine rubber-like flexibility with the processing advantages of thermoplastics. Once heated, TPU can be extruded through a nozzle and shaped layer by layer. After cooling, it retains a degree of elasticity instead of becoming fully rigid.
Unlike a single fixed material, TPU is a broad category. Different formulations can vary in hardness, elasticity, abrasion resistance, chemical resistance, and surface finish. This is why the correct print settings depend on the specific spool rather than the material name alone.

Key Properties of TPU Material
TPU is widely used for parts that need to handle movement, friction, or repeated contact. According to Covestro’s thermoplastic polyurethane overview, TPU materials can offer a useful combination of durability, flexibility, chemical resistance, and weather resistance. Exact performance depends on the formulation.
For 3D printing, the most relevant properties include:
-
Flexibility for parts that need to bend or compress
-
Elastic recovery after deformation
-
Abrasion resistance for surfaces exposed to friction
-
Impact resistance for protective components
-
Resistance to oils, greases, and some chemicals
-
A broad hardness range for different functional needs
These properties make TPU suitable for more than decorative prints. It can be used for workshop parts, flexible accessories, protective components, and prototypes that need to behave more like the final product.
Understanding TPU Hardness: Shore A vs Shore D
TPU hardness is commonly expressed with a Shore rating, such as 85A, 95A, or 64D. The number indicates the relative hardness within a specific shore scale. A higher number on the same scale generally means a harder material.
However, Shore A and Shore D are not interchangeable. The ASTM D2240 standard covers several durometer scales, including Shore A and Shore D. Each scale uses a different indentor and testing method. There is no simple universal conversion between them. A technical explanation from ZwickRoell describes Shore A as a common scale for softer rubber-like materials and Shore D as a scale for harder plastics and thermoplastics.
The following table provides a practical starting point for TPU 3D printing:
|
TPU Hardness |
General Feel |
Common Applications |
Printing Considerations |
|
85A |
Soft and highly flexible |
Soft grips, seals, wearable parts, straps |
More sensitive to buckling and feeding issues |
|
95A |
Flexible but easier to control |
Protective covers, cable organizers, pads, flexible hinges |
A practical starting point for many TPU projects |
|
64D |
Firmer and more structured |
Wear-resistant sleeves, rollers, functional parts, structured flexible designs |
Usually easier to feed but requires material-specific temperature settings |
Hardness should match the intended function of the part. A softer TPU is useful when compression and elasticity matter most. A harder TPU is better when the print needs more structure, dimensional stability, or wear resistance.
Why Choose TPU for 3D Printing?
TPU fills the gap between rigid plastic parts and soft rubber-like components. It allows makers, product designers, and workshops to produce flexible parts without using molds or separate casting processes.
Excellent Flexibility and Elasticity
TPU can bend, stretch, and return toward its original shape after deformation. This makes it useful for parts that need controlled movement, such as straps, protective covers, flexible joints, and wearable accessories.
The amount of flexibility depends on the Shore hardness, wall thickness, infill pattern, and part geometry. A thin 95A print may feel soft and flexible, while a thick 95A print with dense infill may feel much firmer.
Strong Impact and Abrasion Resistance
TPU is often selected for parts that experience repeated friction or minor impacts. Examples include protective corners, feet, bumpers, sleeves, wheels, and workshop components.
Abrasion resistance is especially useful for parts that contact hard surfaces. However, printed performance still depends on layer adhesion, print orientation, and wall design. A poorly tuned TPU print may fail between layers before the material reaches its full potential.
Good Chemical and Weather Resistance
Many TPU grades offer useful resistance to oils, greases, abrasion, and outdoor exposure. This can make TPU a practical option for cable protection, seals, workshop accessories, and selected outdoor parts.
Material performance varies by formulation. Always check the filament manufacturer’s technical data before using a printed TPU part around chemicals, heat, prolonged UV exposure, or safety-critical equipment.
Ideal for Functional and End-Use Parts
TPU is useful when a printed part needs to perform a real function rather than simply display a shape. It can absorb vibration, protect surfaces, create grip, or allow controlled movement.
Common functional TPU prints include non-slip feet and pads, flexible cable strain reliefs, protective device covers, tool grips, gaskets and seals, storage inserts, flexible clips, and shock-absorbing bumpers.
TPU can also support iterative product development. A designer can adjust thickness, hardness, or internal structure without creating a new mold for every test.
A Wide Range of Real-World Applications
TPU is used across consumer, workshop, and prototyping applications. Makers often print flexible toys, wearable accessories, phone cases, and custom organizers. Workshops may use TPU for protective pads, covers, fixtures, or replacement components. Product development teams can use it to test flexible geometries before moving to another manufacturing process.
The material is also useful for multicolor designs. Harder TPU grades can support more structured parts while retaining a flexible feel.
How TPU Printing Differs from Standard Filaments
Rigid filaments travel through the extruder in a relatively predictable way. TPU behaves differently because it can bend and compress before it reaches the nozzle. If the filament path has too much open space, the material may buckle instead of feeding smoothly.
TPU is also more sensitive to moisture and excessive retraction. A successful workflow usually involves drying the filament, using conservative speeds, minimizing unnecessary retraction, and checking the first layer before continuing a long print.
How to Print TPU Successfully
TPU printing becomes easier when each step is controlled. Start with a suitable hardness, confirm printer compatibility, prepare the filament, and run a small test before printing a large part.
Choose the Right TPU Filament
Begin with the intended function of the part. A soft 85A filament can work well for compressible parts and highly flexible accessories. A 95A filament offers a balanced starting point for many projects. Harder TPU grades, such as 64D, can be suitable for structured parts and more stable feeding.
When comparing 3d printer filament, check the spool specifications before slicing the model. Different TPU formulations may require different nozzle temperatures, drying instructions, bed temperatures, and speed limits.
Why Direct Drive Beats Bowden for TPU
A direct-drive extruder places the filament drive mechanism close to the nozzle. This creates a shorter and more controlled path for flexible filament. It reduces the distance over which TPU can bend, compress, or buckle.
A Bowden setup can still print some harder TPU grades, but it usually requires more careful tuning. The filament path should be smooth and constrained. Retraction should remain conservative, and the print speed may need to be reduced.
For very soft TPU, a short and well-supported filament path becomes especially important. Before choosing a printer or filament, check the current compatibility list and the recommended setup for the specific material grade.
Dry TPU Before Printing
TPU absorbs moisture from the surrounding air. Wet filament can create popping sounds, bubbles, rough surfaces, inconsistent extrusion, and weaker layer bonding. Drying should be part of the preparation process rather than a troubleshooting step used only after a print fails.
Flashforge provides a general drying reference of 50°C for six hours for its TPU filament. The AD5X FAQ gives a more specific workflow for TPU 64D: dry the material at 70°C for eight hours before placing it in a dry box, then keep the dry-box humidity below 15%. These instructions apply to different material workflows, so follow the guidance for the exact spool and printer combination.
For a more detailed drying checklist, refer to TPU Drying Temperature: How to Dry TPU Filament for Perfect Prints.
Prepare Your 3D Printer for TPU
Check the nozzle, filament path, build plate, and slicer profile before loading TPU. A clean nozzle and a smooth feed path reduce the risk of inconsistent extrusion. The build plate should also be clean and properly leveled.
The best 3d printer for TPU is not simply the model with the highest speed rating. Filament hardness, feed-path design, nozzle options, drying requirements, and the type of finished part all affect the decision.
For makers who want to create colorful flexible models, the Flashforge AD5X provides an integrated IFS filament system and official support for multicolor TPU 64D printing. Its specification page lists TPU 95A as a recommended material for single-color printing and TPU 64D–75D as supported filament options.
The Flashforge Wiki recommends a 0.6 mm nozzle for TPU 64D on the AD5X to reduce the chance of clogging, although a 0.4 mm nozzle can also be used. This makes the AD5X a practical option for wearable accessories, flexible figurines, and personalized multicolor designs made with compatible harder TPU grades.
Softer TPU may require a different printer setup. Always confirm filament compatibility before starting the print.
Load and Feed TPU Correctly
Feed TPU slowly and avoid forcing it through the extruder. Make sure the filament enters the path cleanly without sharp bends or unnecessary resistance.
If the filament buckles during loading, unload it and inspect the path. Check for partial clogs, gaps around the drive gears, excessive tension, or a spool that does not rotate freely.
Start with Conservative Print Speeds
TPU generally prints more reliably at slower speeds than rigid materials. A slower initial speed gives the filament more time to feed consistently and reduces pressure changes inside the nozzle.
For troubleshooting, begin with a conservative range of approximately 20–40 mm/s, then adjust based on hardness, part geometry, and the filament supplier’s profile. Very soft TPU may require lower speeds. Harder TPU may support faster printing after calibration.
Test and Fine-Tune Your Settings
Use a small calibration print before starting a large project. A simple cube, thin-wall test, or retraction tower can reveal issues with stringing, flow, layer bonding, and dimensional accuracy.
Change one setting at a time. If several parameters are modified together, it becomes difficult to identify which adjustment improved or reduced print quality.
Monitor the First Layer and Print Quality
Watch the first layer closely. TPU needs reliable adhesion without excessive nozzle pressure. The extrusion lines should connect cleanly and remain consistent across the print area.
During the first several layers, check for curling edges, irregular extrusion, or filament buildup around the nozzle. Early correction can prevent a failed print and reduce wasted material.
Recommended TPU 3D Printing Settings
There is no universal setting profile for every TPU filament. Hardness, formulation, nozzle size, printer structure, and part geometry all affect the result. Use the following values as starting points, then follow the filament manufacturer’s profile when one is available.
Official material pages from Forward AM illustrate the differences between TPU grades. Its Ultrafuse TPU 95A page lists a nozzle temperature range of 210–230°C and a 40°C bed temperature. Its harder Ultrafuse TPU 64D page lists a higher nozzle range of 230–255°C and a bed range of 40–60°C. These values show why one TPU profile should not be applied to every spool.
|
Setting |
Practical Starting Point |
Adjustment Notes |
|
Nozzle temperature |
Follow the spool profile |
A 95A material may start around 210–230°C, while a harder 64D material may require 230–255°C |
|
Bed temperature |
Commonly 40–60°C |
Use the filament supplier’s recommendation |
|
Print speed |
Start around 20–40 mm/s |
Reduce the speed for softer TPU or unstable extrusion |
|
Retraction distance |
Start low and adjust gradually |
Excessive retraction can increase buckling and inconsistent flow |
|
Cooling fan |
Start with the material profile |
Increase cooling for overhangs, but reduce it if layer bonding becomes weak |
|
Layer height |
Around 0.20 mm with a 0.4 mm nozzle |
Adjust based on surface finish, speed, and nozzle size |
|
Wall count |
Begin with 2–4 walls |
Add walls when the part needs more structure or durability |
|
First-layer speed |
Slower than the main print speed |
Prioritize stable adhesion and consistent extrusion |
Optimal Nozzle Temperature
Start with the temperature printed on the spool or listed in the filament supplier’s technical data. If the nozzle temperature is too low, TPU may extrude inconsistently or show weak layer adhesion. If the temperature is too high, stringing, oozing, and surface blobs may increase.
Run a temperature tower when changing TPU brands, hardness grades, or nozzle sizes.
Recommended Bed Temperature
A heated bed can improve first-layer stability. Many TPU filaments work within a moderate bed temperature range, but the correct value depends on the formulation and build surface.
If the first layer lifts at the edges, clean the build plate and confirm leveling before increasing the bed temperature. Excessive heat can make removal more difficult and may not solve the underlying issue.
Print Speed Guidelines for TPU
Speed should match the softness of the filament. Softer TPU usually needs slower printing because it compresses more easily in the feed path. Harder grades are often more tolerant of higher speeds.
For a new spool, begin conservatively. Increase the speed only after the extrusion remains stable through several test prints.
Retraction Settings for Flexible Filament
TPU stringing often leads people to increase retraction too aggressively. This can create a new problem. Excessive retraction may pull soft filament back and forth until it buckles or feeds inconsistently.
Start with a low retraction value and adjust in small increments. Reduce unnecessary travel moves in the slicer when possible. Dry the filament before making large retraction changes.
Cooling Fan Recommendations
Cooling affects both overhang quality and layer bonding. More cooling can help with bridges and small details, but excessive cooling may weaken adhesion between layers.
Use the material profile as the starting point. Adjust the fan only after checking whether the print problem comes from temperature, speed, or moisture.
Layer Height and Wall Settings
A 0.20 mm layer height is a practical baseline for a 0.4 mm nozzle. Thinner layers can improve surface detail but increase print time. Thicker layers can reduce print time but may change the flexibility and surface finish.
Walls often affect TPU strength more directly than excessive infill. Add walls when a functional part needs more structure, better wear resistance, or improved durability around screw holes and edges.
First-Layer Settings for Better Adhesion
Reduce the first-layer speed and confirm that the nozzle is not too close to the build plate. TPU should form connected extrusion lines without being heavily compressed.
A brim can help stabilize tall, narrow, or curling parts. Use adhesion aids only when appropriate for the build surface and follow the printer manufacturer’s guidance.
Common TPU Printing Problems and Solutions
Most TPU failures come from a small number of causes: moisture, unstable feeding, excessive speed, incorrect nozzle temperature, or over-aggressive retraction. Identify the visible symptom first, then adjust one variable at a time.

TPU Stringing and Oozing
Common causes: wet filament, excessive nozzle temperature, long travel moves, or poorly tuned retraction.
What to do: dry the filament first. Then reduce the nozzle temperature in small increments and test a modest retraction adjustment. Avoid increasing retraction aggressively, especially with soft TPU.
Filament Jamming or Buckling
Common causes: soft filament bending inside the path, a partial nozzle clog, excessive feed resistance, or printing too quickly.
What to do: slow the print speed, inspect the nozzle, and check whether the filament path is properly constrained. Make sure the spool rotates freely. For compatible harder TPU on the AD5X, consider the recommended 0.6 mm nozzle when clogging is a concern.
Poor Layer Adhesion
Common causes: nozzle temperature that is too low, excessive cooling, moisture, or printing too quickly.
What to do: dry the filament, increase the nozzle temperature gradually, and reduce speed. Check whether the cooling fan is preventing layers from bonding properly.
Warping and Bed Adhesion Issues
Common causes: an unclean build plate, incorrect first-layer height, fast first-layer printing, or insufficient bed temperature.
What to do: clean and level the build plate, slow the first layer, and confirm the spool profile. Add a brim when the geometry needs additional support.
Inconsistent Extrusion
Common causes: wet filament, unstable feeding, a partial clog, variable spool resistance, or excessive retraction.
What to do: dry the material, inspect the nozzle, and check the entire filament path. Reduce retraction and slow down the print until the extrusion becomes stable.
Surface Defects and Blobs
Common causes: oozing, an overly high nozzle temperature, moisture, or pressure changes during travel moves.
What to do: dry the filament, lower the nozzle temperature gradually, and review travel settings. Use a calibration print to separate temperature issues from retraction issues.
Advanced TPU Printing Tips
Once the basic profile works, advanced adjustments can improve flexibility, strength, dimensional accuracy, and production consistency.
Adjusting Settings for Soft vs Hard TPU
Soft TPU needs the most careful feeding. Reduce print speed, keep retraction conservative, and use a smooth filament path. Harder TPU usually feeds more predictably but may require a higher nozzle temperature.
Do not choose hardness based only on ease of printing. The final part should still meet the intended functional requirement.
Balancing Speed and Print Quality
A fast profile is not useful if it creates stringing, unstable extrusion, or weak layers. Start with a stable baseline, then increase the speed gradually.
Pay attention to small features, corners, and travel-heavy sections. These areas often reveal problems before they appear on the rest of the model.
Optimizing Infill for Flexible Parts
Infill affects how a TPU part compresses, bends, and returns to shape. A lower infill percentage usually creates a softer part. A higher infill percentage creates more support but can reduce flexibility.
Gyroid infill is a useful starting point for many flexible parts because its continuous internal structure distributes support in multiple directions. However, no pattern is automatically best for every project. Geometry, wall count, print orientation, TPU hardness, and the expected load all matter.
For a broader comparison of patterns and density choices, refer to What Is Infill in 3D Printing? A Beginner’s Guide to Patterns and Settings.
A practical starting approach is to begin around 15–25% infill for soft accessories and compressible parts, then increase the density gradually for protective or structural components. When additional strength is needed, consider adding more walls before relying solely on dense infill. Finally, test the printed part under its intended load to verify that the chosen settings provide the desired balance of flexibility and support.
Improving Dimensional Accuracy
Flexible parts can deform during printing and measurement. Avoid assuming that a TPU model will match the dimensional behavior of a rigid PLA or PETG print.
Use a small tolerance test before printing mating parts. Adjust wall thickness, hole diameter, clearance, and flow settings based on the result.
Printing Complex TPU Designs
Complex projects may require several colors, different TPU hardness grades, or a combination of flexible and rigid materials. Separate material paths can make these workflows easier to manage.
The Flashforge Creator 5 uses four independent toolheads and supports multicolor and multi-material printing without the repeated purge cycles associated with single-nozzle color switching. Its official specifications list TPU 90A–95A and TPU 64D among the recommended materials.
This makes the Creator 5 a stronger option for functional prototypes, flexible components, and projects that use multiple compatible materials. Test adhesion between materials before combining them in the same part. Different filaments may not bond reliably even when each material prints well on its own.
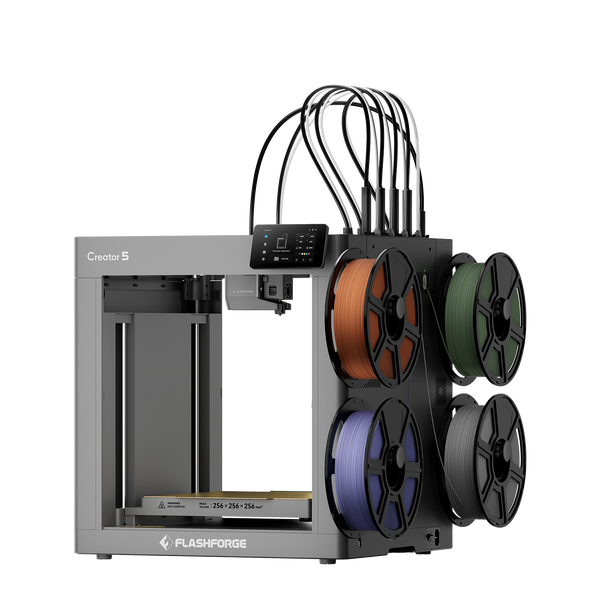
Flashforge Creator 5 4-Toolheads Multi-Color 3D Printer | 500% Faster, Zero Purge Waste
For studios that also work with demanding engineering filaments, the enclosed Flashforge Creator 5 Pro provides a more controlled upgrade. It combines four independent toolheads with a rigid enclosed frame and an active heated chamber that can reach 65°C. These features support broader material workflows when temperature control becomes important.
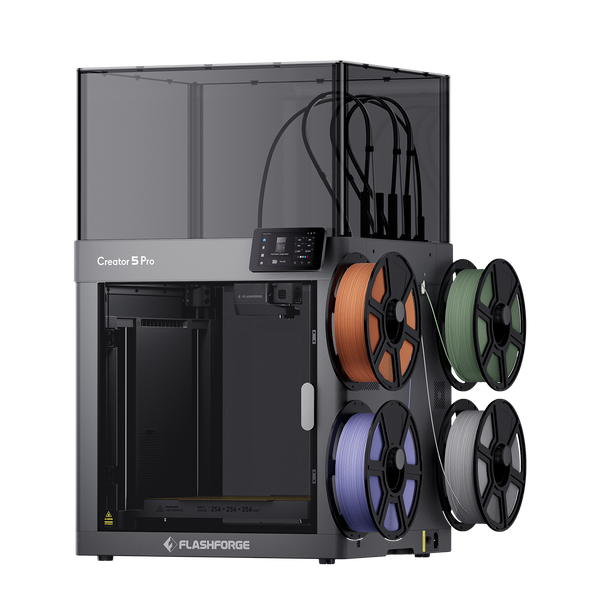
Flashforge Creator 5 Pro 4-Toolheads Enclosed Multi-Color 3D Printer | 500% Faster, Zero Purge Waste
A heated chamber is not automatically necessary for every TPU print. Use the filament profile and the needs of the complete project to decide whether an enclosed workflow adds value.
Conclusion
TPU 3D printing becomes more predictable when the material, printer setup, and slicer profile work together. Start by selecting the right shore hardness for the part. Dry the filament before loading it, use a compatible feed path, begin with conservative speeds, and adjust one setting at a time.
A 95A TPU filament is a practical starting point for many general projects. Softer TPU requires more careful feeding, while harder TPU grades can support structured parts and multicolor workflows. For advanced applications, printer compatibility matters as much as the filament itself.
The best TPU settings are not universal. Use the spool specifications, test a small model, and tune the profile based on the final function of the part.
FAQ
How Do You Choose the Right TPU Filament?
Choose TPU based on the flexibility, durability, and structure required by the part. Softer grades such as 85A are useful for compressible and highly flexible designs. A 95A filament is a balanced option for many accessories and functional components. Harder grades such as 64D are better for structured parts and selected multicolor workflows.
Check the filament supplier’s technical data and the printer compatibility list before ordering.
What Are the Best Applications for TPU 3D Printing?
TPU is suitable for flexible, wear-resistant, and impact-absorbing parts. Common examples include protective covers, seals, grips, cable strain reliefs, flexible clips, wearable accessories, non-slip feet, rollers, sleeves, and prototype components.
Avoid using printed TPU for safety-critical applications unless the material, print process, and final part have been properly validated.
Is 95A TPU Better Than 85A?
Neither grade is universally better. A 95A TPU is generally easier to print and offers more structure. An 85A TPU is softer and better for highly flexible or compressible parts, but it usually requires slower speeds and a more controlled feed path.
Choose the hardness that matches the function of the final print.
What Is the Best Infill for TPU?
There is no single best infill setting for TPU. Gyroid is a useful starting pattern for many flexible parts because it provides continuous internal support in multiple directions. Start with a moderate density, then adjust the percentage, wall count, and print orientation based on the required flexibility and load.
A soft accessory may need relatively low infill. A protective or structural component may need additional walls and a denser internal structure.