


Table of Contents
Maximum speed is one of the most visible numbers on a 3D printer product page, but it does not tell the full story. A printer may advertise 500 mm/s or 600 mm/s, yet the real print time depends on the model shape, layer height, filament, cooling, acceleration, and slicer settings.
Speed also has to work with print quality. A fast printer is not useful if the part shows ringing, weak layers, poor corners, or failed overhangs. The best high-speed 3D printer should move quickly while keeping extrusion stable and details controlled.
This guide explains what high-speed 3D printing means, which hardware features matter, how input shaping improves quality, and which Flashforge models fit different high-speed printing needs.
What Is High-Speed 3D Printing?
High-speed 3D printing means printing faster than a traditional desktop FDM workflow while keeping the model usable, accurate, and visually clean.
The key point is balance. Speed is not just nozzle movement. A printer also needs enough extrusion flow, cooling power, motion stability, and calibration support to maintain quality at higher speeds.

How Print Speed Is Measured
Print speed usually refers to how fast the nozzle moves while extruding material. It is commonly measured in millimeters per second.
Travel speed is different. It describes how fast the toolhead moves when it is not extruding. A printer may have a higher travel speed than its practical extrusion speed.
Acceleration also matters. It controls how quickly the printer reaches the target speed after changing direction. On small models with many corners, acceleration often affects print time more than the top speed number.
Maximum Speed vs. Usable Speed
Maximum speed is the upper limit under selected conditions. Usable speed is the speed that still produces acceptable results on real projects.
A printer may reach a high maximum movement speed, but the nozzle still needs to melt and deposit enough filament. If the hotend cannot maintain flow, the print may show under-extrusion, weak walls, or rough surfaces.
Quality also depends on the frame, belts, cooling system, and slicer profile. A stable 250 mm/s profile can be more valuable than an unstable 600 mm/s setting.
Why Print Time Varies by Model
Two models printed at the same speed can finish at very different times.
A small detailed figurine may require frequent direction changes, short layer times, and slower cooling adjustments. A simple box may allow longer straight movements and more consistent speed.
Layer height, wall count, infill density, supports, material swaps, and cooling pauses also affect total time. This is why a high-speed printer should be judged by real workflow performance, not only by one maximum speed figure.
What Hardware Makes a 3D Printer Fast?
A fast printer needs more than one strong component. Motion structure, acceleration, hotend flow, frame rigidity, cooling, and filament all work together.
The Flashforge guide to choosing the best FDM 3D printer explains why speed, material support, build volume, automation, and reliability should be evaluated together before buying.

CoreXY Motion Reduces Moving Mass
CoreXY motion is common in high-speed FDM printers because it keeps the fast movement concentrated on the toolhead.
In a CoreXY structure, the bed usually moves slowly along the Z-axis while the toolhead handles rapid X and Y movement. This reduces the mass involved in fast direction changes.
Lower moving mass can help the printer accelerate faster and maintain better stability, especially on taller models or repeat production jobs. However, CoreXY still needs a rigid frame, accurate belts, and good calibration to perform well.
High Acceleration and Deceleration Shorten Print Times
Acceleration determines how quickly the printer reaches its target speed.
On small or detailed models, the nozzle may never stay at maximum speed for long. It keeps slowing down, turning, and speeding up again. Higher acceleration can reduce the time lost during those transitions.
Deceleration is just as important. A printer must slow down without creating visible ringing, shifted layers, or corner artifacts.
This is why acceleration numbers should be judged together with frame rigidity and vibration compensation.
High-Flow Hotends Maintain Extrusion
A printer can only print fast if the hotend can melt and push enough filament.
At higher speeds, the filament passes through the melt zone more quickly. If the hotend cannot keep up, the print may show gaps, weak layer bonding, or inconsistent walls.
High-flow hotends, suitable nozzles, and correct temperature settings help maintain stable extrusion. Larger nozzles can also increase flow, but they may reduce fine detail.
Rigid Frames Improve Stability
A rigid frame helps the printer resist vibration during fast movement.
When the toolhead changes direction quickly, weak frame sections can flex. That movement may appear as ghosting, ringing, or inconsistent surfaces.
Metal frames and stable motion systems help control these effects. The benefit becomes more important as speed, acceleration, and print size increase.
Cooling Performance Protects Quality at Speed
Cooling must match the print speed.
When a printer moves faster, each layer has less time to solidify before the next one begins. Poor cooling can cause soft corners, sagging bridges, rough overhangs, or melted details.
Good airflow helps preserve shape during faster printing. Cooling settings should still match the material. PLA usually needs stronger cooling than ABS or ASA, while some engineering materials require a more controlled environment.
Filament Type and Temperature Set Practical Limits
Different materials respond differently to speed.
PLA is often the easiest material for fast printing because it melts predictably and cools quickly. PETG can print fast with the right profile, but it may need more control to avoid stringing or surface marks.
ABS, ASA, PC, PA, and fiber-reinforced materials need more careful temperature control. These materials often benefit from an enclosure or heated chamber.
The right 3d printer filament profile matters as much as the printer hardware. Match the material, nozzle temperature, cooling settings, and enclosure conditions to the finished-part requirements.
How Does Input Shaping Improve High-Speed Printing?
Input shaping helps a printer control vibration during fast movement.
At high acceleration, the printer can create resonance in the frame and motion system. Input shaping adjusts motion commands to reduce that vibration before it becomes visible on the part.
What Input Shaping Does
Input shaping is a motion-control technique that reduces vibration caused by fast direction changes.
Instead of letting the machine shake after a sudden move, the firmware modifies the movement pattern to reduce resonance. This helps the printer maintain cleaner surfaces at higher speeds.
Many high-speed desktop printers combine input shaping with vibration compensation or resonance testing during setup.
How It Reduces Ringing and Ghosting
Ringing and ghosting appear as repeated lines or shadows near corners, text, holes, or raised details.
These marks often come from vibration after the nozzle changes direction quickly. Input shaping helps reduce those repeated surface artifacts.
It does not make every print perfect. A loose belt, weak frame, poor slicer profile, or excessive acceleration can still create visible defects.
Why Calibration Matters
Input shaping works best when it matches the printer's actual mechanical behavior.
Calibration helps the firmware understand how the machine vibrates. If the setup changes, the vibration behavior can change as well.
A nozzle change, belt adjustment, new toolhead, or different table surface may affect the result. Recalibration can help maintain quality when the printer setup changes.
Why Hardware Still Sets the Speed Limit
Input shaping can reduce vibration, but it cannot replace strong hardware.
The printer still needs a rigid frame, stable rails, balanced belts, adequate cooling, and a hotend that can maintain flow. If the hotend cannot melt enough filament, input shaping will not prevent under-extrusion.
High-speed printing works best when motion control and hardware are designed together.
How to Get Faster Prints Without Losing Quality
Faster printing should be adjusted step by step.
Do not increase every speed value at once. Start with a reliable profile, then tune speed, acceleration, flow, cooling, and layer settings in a controlled way.
Tune Slicer Settings for Speed
The slicer controls print speed for walls, infill, top layers, supports, bridges, and travel moves.
Outer walls often need slower speeds to preserve surface quality. Infill can usually print faster because it is hidden inside the part. Travel moves can be faster when the printer handles acceleration well.
A good high-speed profile uses different speeds for different parts of the model instead of applying one speed everywhere.
Adjust Acceleration and Flow Safely
Acceleration can shorten print time, but aggressive settings can increase ringing and stress the motion system.
Raise acceleration gradually. After each change, print a small test part with corners, holes, overhangs, and flat walls.
Flow should also be checked. If the walls look thin or inconsistent, the printer may be moving faster than the hotend can support.
Optimize Model Geometry and Layer Time
Model design affects speed.
Rounded corners, reduced support needs, and better orientation can shorten print time without forcing higher speed settings. Splitting a large model can also improve surface quality and reduce support complexity.
Layer time matters on small parts. When each layer finishes too quickly, the previous layer may not cool enough. Printing multiple small parts at once or adjusting cooling can improve results.
Know When to Trade Speed for Quality
Not every print should use the fastest profile.
A draft prototype may prioritize speed. A display model may need cleaner surfaces. A functional part may need stronger walls and better layer bonding.
Use faster settings when the model only needs fit checking or rough validation. Slow down when surface finish, dimensions, or part strength matter more.
What Are the Best High-Speed 3D Printers?
The best 3d printer for high-speed printing depends on the projects you plan to produce.
The best model depends on what you need to print. A beginner may want simple setup and fast PLA printing. A business may need multi-color production. A studio may need engineering materials or larger build volume.
The Flashforge Blog article 2025 Flashforge Adventurer 3D Printer Reviews is useful for readers comparing the Adventurer series and its high-speed CoreXY platform.
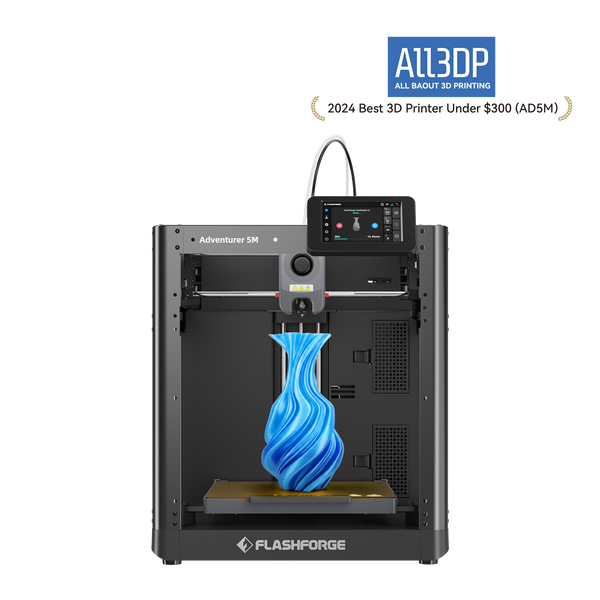
Adventurer 5M for Beginners
The Flashforge Adventurer 5M is a practical high-speed starting point for beginners.
It offers a 220 × 220 × 220 mm build volume, automatic leveling, quick-detach nozzles, vibration compensation, and an all-metal CoreXY structure. Flashforge lists a maximum print speed of 600 mm/s and a maximum acceleration of 20,000 mm/s².
Its strength is accessibility. Beginners can start with PLA and PETG projects while learning how speed, layer height, and cooling affect quality.
The Adventurer 5M is an open-frame printer, so it is not the best choice for ABS-series printing in its standard setup. Buyers who need more material control should consider an enclosed model.
AD5X for Multi-Color Printing
The Flashforge AD5X is designed for accessible multi-color printing.
It uses an integrated IFS for four-color printing and provides a 220 × 220 × 220 mm build volume. Flashforge lists a maximum print speed of 300 mm/s, a maximum travel speed of 600 mm/s, and a maximum acceleration of 20,000 mm/s².
This distinction matters. Multi-color speed depends not only on movement speed, but also on color changes, filament loading, model layout, and purge settings.
The AD5X fits personalized models, toys, labels, small products, and multi-color creative projects where setup simplicity matters.
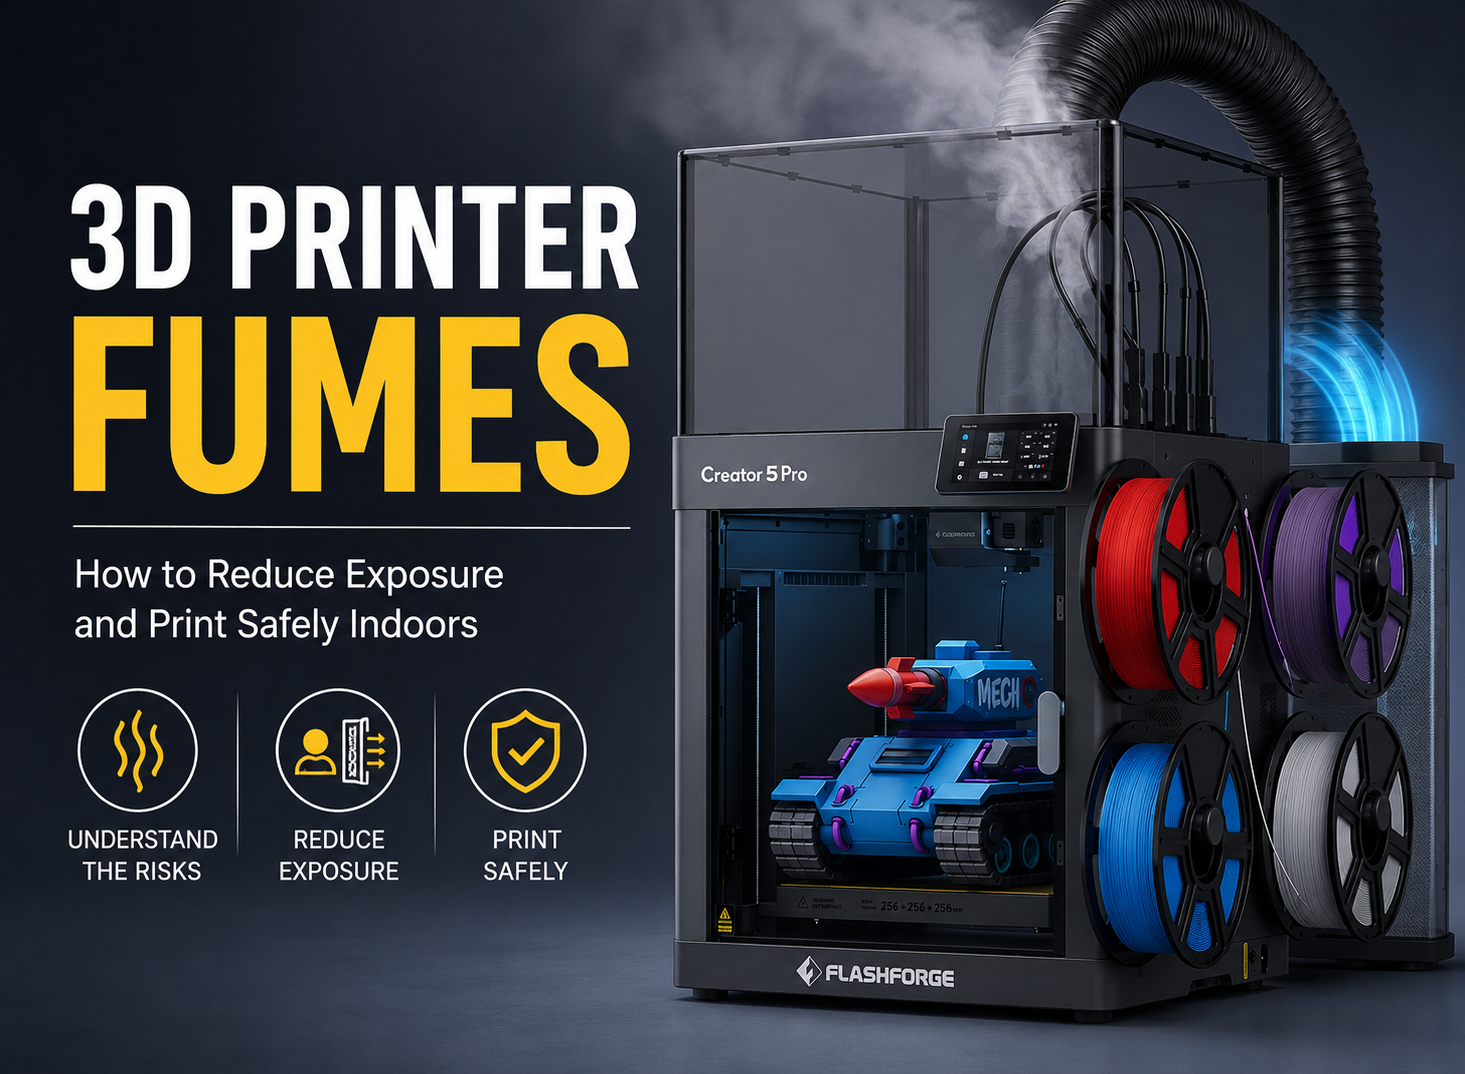
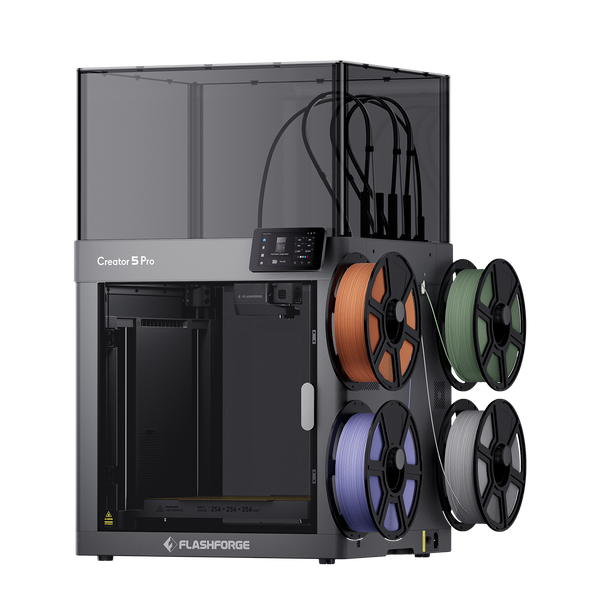
Creator 5 Pro for Multi-Material Printing
The Flashforge Creator 5 Pro is built for professional multi-color and multi-material workflows.
It uses four independent FlashSwap toolheads, a 256 × 256 × 256 mm build volume, automatic multi-toolhead offset calibration, and a fully enclosed frame. Flashforge lists a maximum print speed of 300 mm/s, a maximum travel speed of 600 mm/s, and acceleration up to 30,000 mm/s².
Its active heated chamber reaches up to 65°C. This helps create a more controlled environment for materials such as ABS, ASA, PC, PA, PC-ABS, PPS-CF, and fiber-reinforced filaments.
The Creator 5 Pro is best for design studios, prototyping teams, engineering workflows, and selected small-batch production tasks where speed, material flexibility, and repeatability matter together.
Flashforge Creator 5 Pro 4-Toolheads Enclosed Multi-Color 3D Printer | 500% Faster, Zero Purge Waste
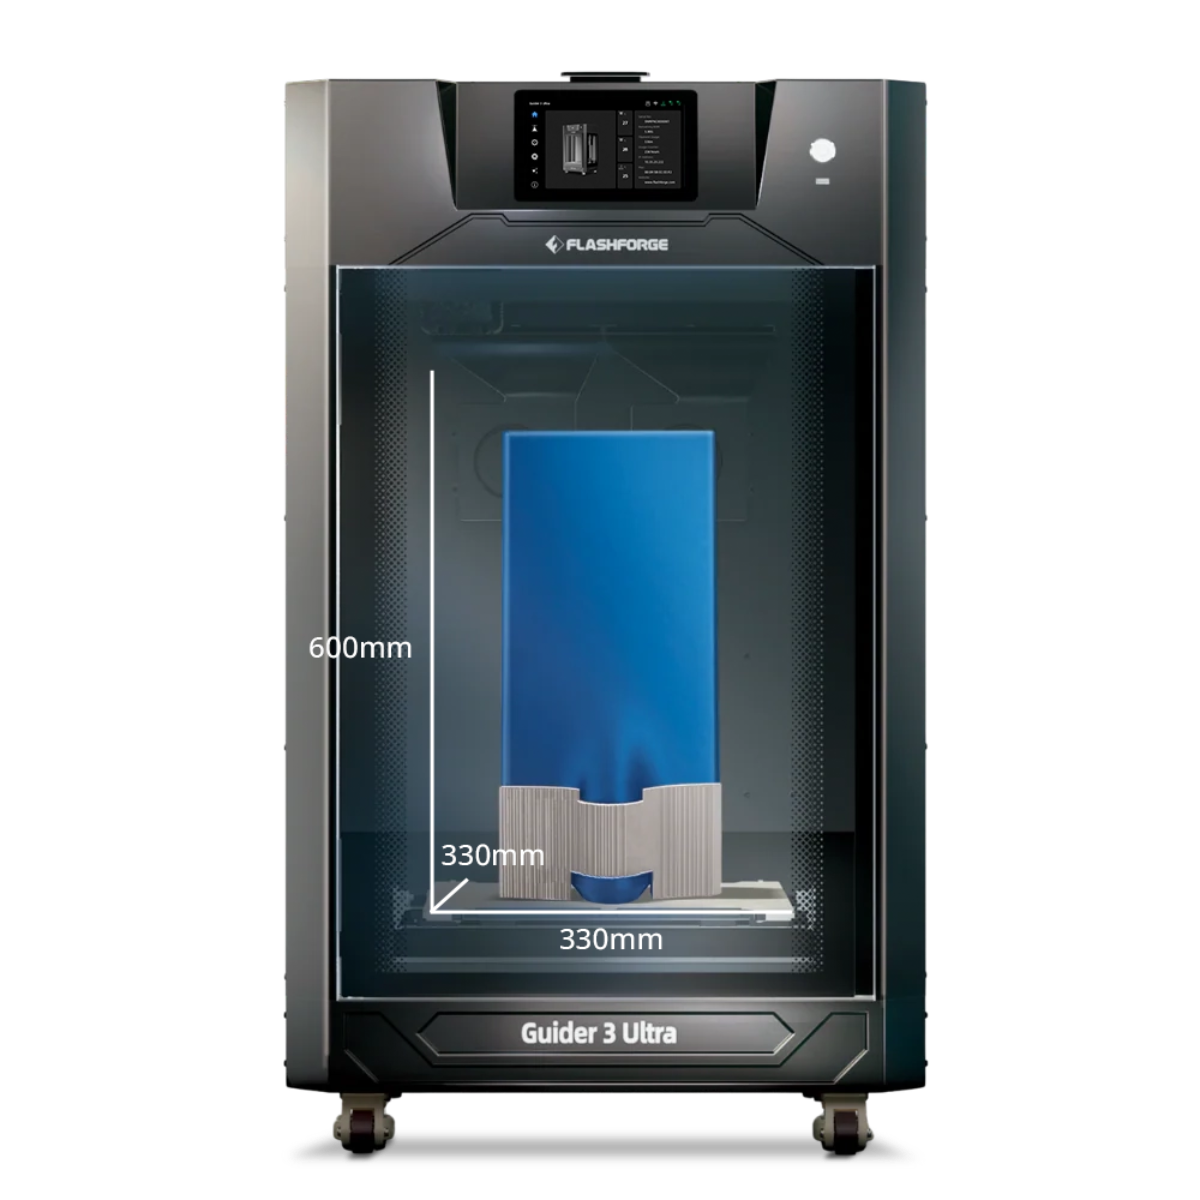
Guider 3 Ultra for Large Projects
The Flashforge Guider 3 Ultra is the stronger fit for large or tall projects.
It uses a CoreXY structure and offers a large build volume of 330 × 330 × 600 mm in single-extruder mode. Flashforge lists a printing speed range of 10 to 500 mm/s and a maximum acceleration of 20,000 mm/s².
The dual-extruder system supports soluble-support workflows, which can help with complex prototypes, tall functional parts, cosplay components, and large samples.
For large models, speed is not only about movement. Build volume, support strategy, material feeding, and print stability all affect the final workflow.
How Should You Choose a High-Speed 3D Printer?
A high-speed printer should match your projects, materials, and tolerance for setup work.
When reviewing a 3d printer for sale, do not compare maximum speed alone. Build volume, acceleration, extrusion flow, cooling, enclosure design, maintenance requirements, and material support all affect long-term value.
A balanced printer should offer usable speed, stable quality, and a workflow that fits your space.
Look Beyond Maximum Speed
Maximum speed is only a starting point.
Compare print speed, travel speed, acceleration, flow rate, cooling, frame rigidity, and slicer support. A printer with a lower headline speed may finish certain models faster if it accelerates well and maintains flow.
Published speed claims should be read as capability limits, not guaranteed print times for every model.
Match Build Volume to Your Projects
Build volume determines whether a model can be printed in one piece.
A 220 × 220 × 220 mm desktop printer is enough for many household parts, toys, small prototypes, and classroom projects. Larger fixtures, cosplay sections, and tall models may require a larger machine such as Guider 3 Ultra.
A fast printer that cannot fit the part will still require splitting, assembly, and post-processing.
Check Enclosure and Material Support
Material requirements should guide the printer choice.
PLA and PETG are practical for fast everyday printing. ABS, ASA, PC, PA, and composite filaments need more controlled conditions.
An enclosure helps reduce temperature swings. An actively heated chamber provides stronger control for engineering materials.
Check nozzle temperature, bed temperature, enclosure design, chamber conditions, and the recommended filament list before buying.
Consider Total Multi-Color Print Time
Multi-color printing adds time that is not always obvious in a speed specification.
Color changes, filament loading, purging, tool changes, and prime structures can all affect total print duration. A printer with fast movement may still take longer if the multi-color system creates many interruptions.
For AD5X, the integrated IFS lowers the barrier to four-color printing. For Creator 5 Pro, independent toolheads reduce repeated loading and purging during multi-material work.
Choose the system that matches the number of colors, materials, and swaps in your real projects.
Review Setup and Maintenance Requirements
High-speed printers still need maintenance.
Check how the printer handles bed leveling, vibration compensation, nozzle changes, filament detection, and power-loss recovery. Also review software support and remote monitoring if you plan to run several machines.
A fast machine should reduce workflow friction. If it requires too much manual tuning for your use case, the speed advantage may not translate into daily value.
Conclusion
A high-speed 3D printer should be evaluated by more than its maximum speed rating. Real-world performance depends on factors such as motion system design, acceleration, hotend flow, cooling, slicer settings, and model geometry, all of which influence both print time and quality.
For different needs, Adventurer 5M is a strong entry-level choice for fast everyday printing, AD5X adds convenient four-color capabilities, Creator 5 Pro supports professional multi-material applications with its heated chamber, and Guider 3 Ultra is well suited for large-format projects. Ultimately, the best high-speed 3D printer is the one that balances speed, quality, and workflow requirements for your specific applications.
FAQ
Is 600 mm/s a Realistic Printing Speed?
It can be realistic as a maximum speed under selected conditions, but it does not mean every model will print at 600 mm/s.
Small details, corners, cooling limits, filament flow, layer height, and quality settings all reduce real-world speed. Treat 600 mm/s as a capability figure, not a guaranteed average print speed.
Is CoreXY Always Faster Than a Bed Slinger?
No.
CoreXY usually provides a stronger foundation for high acceleration because the bed does not move rapidly along the Y-axis. This can help with speed and stability.
However, actual performance still depends on the frame, belts, hotend, cooling, firmware, slicer profile, and material.
Does Higher Acceleration Reduce Print Time?
Often, yes.
Higher acceleration helps the printer reach target speed faster after corners and direction changes. This is especially useful on models with many short movements.
However, excessive acceleration can create ringing, weak details, or mechanical stress. It should be tuned with vibration compensation and real test prints.
Does Faster Printing Reduce Quality?
It can, but it does not have to.
Faster printing may reduce quality when cooling, extrusion flow, frame rigidity, or slicer settings cannot keep up. A well-designed high-speed printer can preserve quality at higher speeds by using stable motion, input shaping, and enough cooling.
Use slower settings for display surfaces, fine details, and functional parts that need strong layer bonding.
Which Filament Works Best for Fast Printing?
PLA is usually the easiest filament for fast printing because it melts predictably and cools quickly.
High-speed PLA or well-tuned PETG can also work well on compatible printers. ABS, ASA, PC, PA, and composite materials may need an enclosure, higher nozzle temperatures, and more controlled cooling.
Always match the filament to the printer profile and the finished part requirements.