


Table of Contents
TPU is one of the most useful flexible 3D printing materials. It can bend, stretch, absorb impact, and return to shape, which makes it suitable for protective covers, grips, seals, gaskets, wearable parts, anti-slip feet, and flexible prototypes.
TPU also needs more careful slicer settings than rigid filaments. Its flexible structure can compress inside the filament path, react poorly to excessive retraction, and show stringing if the filament is wet or the nozzle is too hot. A stable TPU print starts with the right hardness, dry filament, controlled speed, and a printer that can feed flexible material smoothly.
Why Does TPU Require Special Print Settings?
TPU behaves differently from PLA, PETG, and ABS. It is soft, elastic, and more sensitive to feeding pressure, so slicer settings need to control extrusion rather than force speed.
TPU Flexibility and Feeding Resistance
Rigid filaments move through the extruder in a more predictable way. TPU can bend, stretch, or buckle before it reaches the hot end.
That is why TPU needs a smooth filament path, steady spool movement, lower print speed, and conservative retraction. When the feed path has too much friction or open space, the filament may compress instead of pushing cleanly into the nozzle.
How Shore Hardness Affects Slicer Settings
TPU hardness is commonly listed as Shore A or Shore D. Softer grades such as 85A bend more easily, but they are harder to feed and usually need slower speeds. Harder grades such as 95A or 64D feed more predictably, but the finished part feels less soft.
When comparing 3D printer filament types, check the hardness, nozzle temperature, bed temperature, and speed range before slicing. A TPU profile for 95A should not be copied directly to a softer or harder spool.

Why TPU Prints Slower Than PLA
TPU prints more slowly because the filament can compress during extrusion. Fast acceleration, high print speed, and aggressive retraction can create pressure changes inside the hot end.
A slower profile gives TPU more time to feed evenly. It also reduces stringing, under-extrusion, surface gaps, and jamming. Flashforge’s filament guide also notes that flexible materials such as TPU require slower print speeds than many rigid filaments, so speed should be treated as a material-specific setting rather than a fixed printer capability.
Before You Adjust TPU Slicer Settings
Good TPU printing starts before the slicer profile. The filament, printer, nozzle, build plate, and feed path all affect the final result.
Choose the Right TPU Hardness
Choose TPU hardness based on the function of the part. Softer TPU is better for compressible parts, soft grips, vibration damping, and flexible accessories. Harder TPU works better for structured flexible parts, protective shells, and selected multi-color workflows.
For a first TPU project, 95A is usually easier to control than very soft TPU. It still provides flexibility, but it feeds more consistently on many desktop FDM printers.
Dry TPU Before Printing
TPU absorbs moisture from the air. Wet TPU can cause popping sounds, bubbles, rough surfaces, stringing, weak layer bonding, and inconsistent extrusion.
Drying should happen before major slicer changes. Flashforge’s TPU drying temperature article lists 50°C for 6 hours as a general Flashforge TPU reference, while AD5X TPU 64D uses a separate workflow of 70°C for 8 hours and dry-box humidity below 15% during printing. Always follow the instructions for the exact spool and printer setup.
Use a Flexible-Filament-Friendly Printer
A TPU-friendly printer should have a smooth feed path, stable extrusion, reliable first-layer control, and support for the TPU grade you plan to use. The best 3d printer for flexible filament is not simply the fastest machine. Feed-path design, direct material support, nozzle options, and speed control matter more.
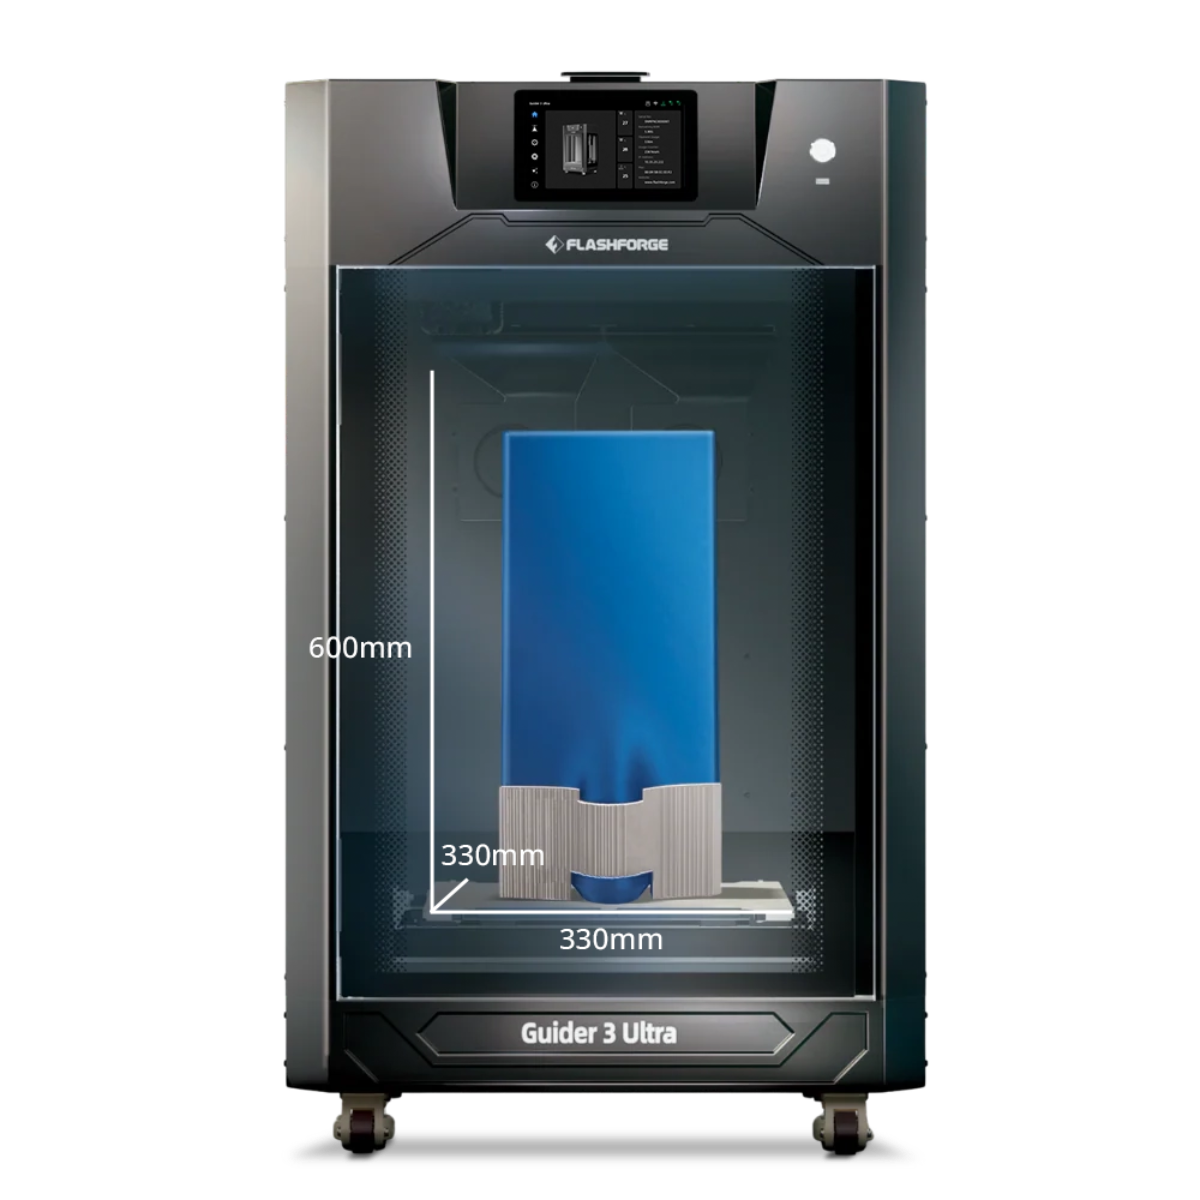
The Flashforge AD5X is a practical option for entry- to intermediate TPU printing, especially for users who want to explore compatible multi-color TPU workflows. Its official specifications list TPU95A as recommended for single-color printing and TPU64D-75D as supported filament options.
The Flashforge Creator 5 fits more advanced TPU and multi-material flexible projects. Its four independent toolheads support TPU-90A, TPU-95A, and TPU-64D, along with other common and support materials.
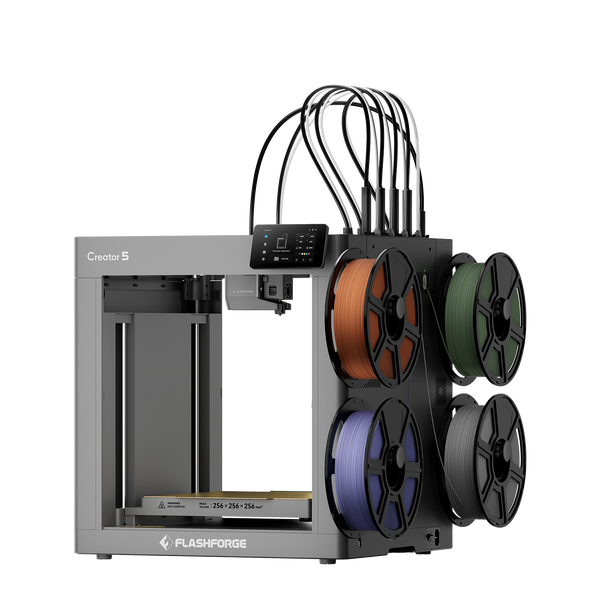
Flashforge Creator 5 4-Toolheads Multi-Color 3D Printer | 500% Faster, Zero Purge Waste
The Flashforge Creator 5 Pro is better suited to professional TPU workflows and later material expansion. It keeps the four-toolhead workflow and adds an enclosed frame, active chamber heating, filtration, auxiliary cooling, and broader engineering-material support.
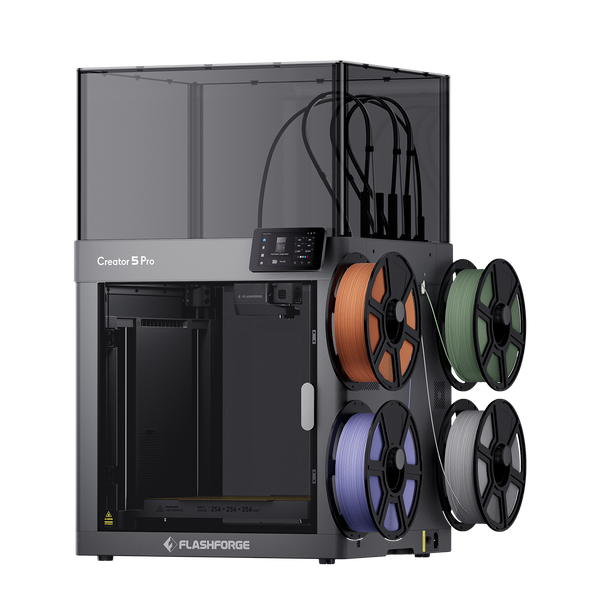
Flashforge Creator 5 Pro 4-Toolheads Enclosed Multi-Color 3D Printer | 500% Faster, Zero Purge Waste
Check the Filament Path and Extruder
Before loading TPU, inspect the nozzle, filament tube, spool holder, extruder gear, and filament entry point. TPU should move smoothly without sharp bends or drag.
A clean nozzle and a free-spinning spool reduce feeding resistance. If TPU buckles during loading, unload it and check for partial clogs, excessive tension, or a spool that does not rotate freely.

Core TPU Print Settings in Your Slicer
TPU settings are not universal. Use the 3D printer filament supplier’s profile first, then adjust in small steps based on hardness, surface quality, and part function.
Nozzle Temperature for TPU
Many TPU profiles start from around 210°C to 250°C, but the exact value depends on hardness, formulation, print speed, and nozzle size. A softer TPU may print well at the lower end, while harder TPU may need a higher temperature.
If the nozzle temperature is too low, the print may show weak layer bonding, rough extrusion, or gaps. If it is too high, TPU may string, ooze, blob, or leave a glossy uneven surface.
Bed Temperature and Adhesion Settings
TPU often prints with a moderate bed temperature, commonly around 40°C to 60°C. The right setting depends on the build plate, filament brand, and part footprint.
Clean the build surface before printing. If the part lifts, check first-layer height, bed cleanliness, and first-layer speed before raising the bed temperature. If TPU sticks too strongly, follow the printer manufacturer’s build-plate guidance before using glue or release agents.
Layer Height and Line Width
A 0.20 mm layer height is a practical starting point with a 0.4 mm nozzle. Thinner layers can improve surface detail, but they increase print time and may expose flow inconsistency.
Line width should stay close to the nozzle size unless the slicer profile recommends otherwise. A slightly wider line can improve bonding and durability, but excessive width may create over-extrusion on flexible walls.
Flow Rate and Extrusion Multiplier
TPU can look under-extruded if the speed is too high or the filament is slipping. Do not increase flow immediately.
First check filament dryness, nozzle temperature, print speed, and spool resistance. If the printer feeds smoothly but the part still has gaps, adjust flow rate in small steps and confirm the result with a short test print.
TPU Speed, Retraction, and Travel Settings
Speed, retraction, and travel movement control most TPU stringing and feeding issues. Tune these settings together, but change only one variable at a time.
Print Speed for Flexible Filament
A safe TPU starting range is often 20 to 40 mm/s. Softer TPU may need slower speeds, while harder TPU can sometimes print faster after calibration.
Do not judge TPU by the printer’s maximum speed. Flexible filament needs stable pressure in the hot end. If the surface becomes rough or the extrusion turns inconsistent, slow the profile before changing multiple settings.
Retraction Distance and Retraction Speed
TPU usually needs low retraction. Too much retraction can pull soft filament back and forth until it buckles, stretches, or feeds unevenly.
Start with the printer’s TPU profile. If stringing appears, dry the filament and lower the nozzle temperature first. Then adjust retraction distance and speed in small increments.
Travel Speed and Combing Settings
Higher travel speed can reduce the time the nozzle spends crossing open space, which may reduce stringing. It should still stay within the printer’s stable motion range.
Combing can help keep travel moves inside printed areas. This may reduce visible strings on outer surfaces. Test combing with your model shape because it can also leave marks if the nozzle crosses soft printed features.
Z-Hop and Avoid-Crossing-Perimeters
Z-hop can reduce nozzle dragging on flexible parts, especially on tall or soft prints. Use it carefully because extra vertical moves can increase print time and may create more ooze.
Avoid-crossing-perimeters can improve surface quality by reducing travel over visible walls. It is useful for cosmetic TPU parts, but the added travel can increase print time. Use it when surface quality matters more than speed.
Cooling, Supports, and First-Layer Settings
TPU cooling and support settings should protect layer bonding first. Too much cooling or too much support contact can create weak parts or difficult removal.
Cooling Fan Settings for TPU
Cooling helps with bridges, small details, and overhangs. Too much cooling can reduce layer bonding and make flexible parts weaker.
Start with the filament profile. Increase fan speed only when overhangs sag or small features look soft. Reduce cooling if layers split, walls look weak, or the part tears along layer lines.
First-Layer Speed and Squish
TPU needs a slow, controlled first layer. A first-layer speed around 10 to 20 mm/s often improves adhesion and helps the filament settle evenly.
Avoid excessive squish. If the nozzle is too close, TPU can drag, smear, or build pressure in the hot end. The first layer should look connected and slightly flattened, not crushed.
Support Settings for Flexible Prints
Supports are harder to remove from TPU than from rigid materials. Use supports only where the model truly needs them.
Increase support gap slightly when removal is difficult. Reduce support density when the surface can tolerate it. For functional TPU parts, redesigning the model to avoid support may produce a better result than forcing a complex support structure.
Infill and Wall Settings for Durable Parts
Walls often affect TPU strength more than high infill. Add walls when the part needs better wear resistance, stronger edges, or more structure around holes and contact points.
Lower infill creates a softer part. Higher infill makes the part firmer but reduces flexibility. Gyroid and grid-style infill can both work, but the best pattern depends on how the part bends, compresses, or carries load.
Best TPU Printing Settings
Use these values as starting points. The best TPU settings still depend on hardness, nozzle size, filament brand, printer structure, and part geometry.
Basic TPU Slicer Settings to Start With
|
Setting |
Practical Starting Point |
Adjustment Notes |
|
Nozzle temperature |
210°C to 250°C |
Follow the spool first |
|
Bed temperature |
40°C to 60°C |
Match the build surface |
|
Print speed |
20 to 40 mm/s |
Slower for softer TPU |
|
First-layer speed |
10 to 20 mm/s |
Prioritize adhesion |
|
Retraction |
Low or profile default |
Increase only in small steps |
|
Cooling fan |
Profile default |
Balance overhangs and bonding |
|
Layer height |
0.20 mm with 0.4 mm nozzle |
Adjust for detail or speed |
|
Walls |
2 to 4 walls |
Add walls for durability |
|
Infill |
10% to 40% |
Tune by flexibility need |
Use these values as a baseline, not a fixed formula. For a broader material workflow, Flashforge’s article on how to use a 3D printer for different filaments is useful because it explains why temperature, speed, retraction, and drying change across filament types.
Best Settings for Softer TPU
Softer TPU needs slower speed, lower retraction, a smoother feed path, and more careful first-layer control. Start near the lower end of the speed range and increase only after extrusion looks stable.
Avoid aggressive travel and retraction settings. If the filament buckles, the slicer profile may not be the only issue. Check the extruder path, spool resistance, and nozzle condition.
Best Settings for Cleaner Surface Quality
Cleaner TPU surfaces usually come from dry filament, stable extrusion, lower print speed, and controlled nozzle temperature. Do not chase surface quality with retraction alone.
Run a small test before a long print. If the surface has fine strings, dry the spool and lower the nozzle temperature slightly. If the surface has gaps, slow the print and check flow stability.
When to Adjust Hardware Instead of Slicer Settings
Slicer settings cannot fix every TPU problem. If the filament keeps buckling, jamming, or feeding inconsistently, inspect the hardware.
Check for a worn nozzle, partial clog, loose filament path, high spool drag, or an extruder that does not constrain flexible material well. For harder TPU workflows on AD5X, a 0.6 mm nozzle may reduce clog risk compared with a smaller nozzle.
Common TPU Printing Problems and Setting Fixes
Most TPU printing issues can usually be traced back to factors such as moisture, excessive speed, unstable feeding, too much retraction, or incorrect temperature. To troubleshoot effectively, start by identifying the visible symptom, then adjust the most likely cause accordingly.
TPU Stringing and Oozing
Stringing usually comes from wet filament, high nozzle temperature, long travel moves, or poorly tuned retraction. Dry the TPU before making major slicer changes.
Then lower the nozzle temperature in small steps and test modest retraction changes. Avoid large retraction jumps because they can make flexible filament feed less consistently.
TPU Jamming in the Extruder
Jamming often happens when the TPU bends inside the filament path or meets too much resistance before the hot end. It can also happen when the nozzle is partially clogged.
Slow the print speed, reduce retraction, and check whether the spool rotates smoothly. Inspect the nozzle and make sure the filament path is clean, short, and supported.
Poor Layer Adhesion or Weak Parts
Weak TPU parts can come from low nozzle temperature, too much cooling, wet filament, or printing too fast. The layers may split when stretched or compressed.
Dry the filament, raise the nozzle temperature gradually, reduce fan speed, and slow the print. Add more walls if the part needs stronger edges or better wear resistance.
Blobs, Gaps, and Inconsistent Extrusion
Blobs and gaps often come from pressure changes in the nozzle. Wet filament, unstable feeding, excessive retraction, and high speed can all make the issue worse.
Start by drying the spool and slowing the print. Then check the extruder path, reduce aggressive retraction, and fine-tune flow only after the mechanical path is stable.
Conclusion
TPU printing becomes more reliable when the slicer profile matches the material. Start with dry filament, choose the right Shore hardness, use a printer that can feed flexible filament smoothly, and keep print speed conservative.
The strongest TPU profile is not the fastest one. It is the profile that feeds consistently, bonds layers well, controls stringing, and keeps the finished part flexible enough for its function.
For Flashforge users, AD5X is a practical choice for entry- to intermediate TPU and compatible multi-color TPU projects. Creator 5 supports more advanced TPU and multi-material workflows with four independent toolheads. Creator 5 Pro adds a more controlled, professional platform for TPU plus future engineering-material expansion.
If you are comparing a 3d printer for sale, match the deal to your TPU workflow first. AD5X fits accessible flexible printing and multi-color TPU exploration, while Creator 5 and Creator 5 Pro are stronger choices for users who need multi-toolhead flexibility, material expansion, or professional production stability.
FAQ About TPU Print Settings
What is the best speed for TPU printing?
A common TPU starting speed is 20 to 40 mm/s. Softer TPU often needs slower speeds, while harder TPU can sometimes print faster after tuning. Stable extrusion matters more than maximum printer speed.
What temperature should TPU be printed at?
Many TPU filaments print around 210°C to 250°C, but the correct temperature depends on hardness, formulation, nozzle size, and speed. Follow the filament supplier’s recommended profile first, then use a temperature tower if the surface shows stringing, gaps, or weak bonding.
How to properly print with TPU?
Choose the right TPU hardness, dry the filament, check the feed path, use a conservative print speed, keep retraction low, and test a small model first. TPU responds best when the printer, filament, and slicer settings are tuned together.
How to get smooth TPU prints?
Dry the filament first, reduce print speed, avoid excessive nozzle temperature, and tune retraction gradually. Smooth TPU prints usually come from stable feeding and moisture control rather than one single slicer setting.
Does TPU need retraction?
Yes, but TPU usually needs less retraction than rigid filaments. Too much retraction can cause buckling, inconsistent feeding, or jams. Start with the default TPU profile and adjust in small steps only after the filament is dry.